|
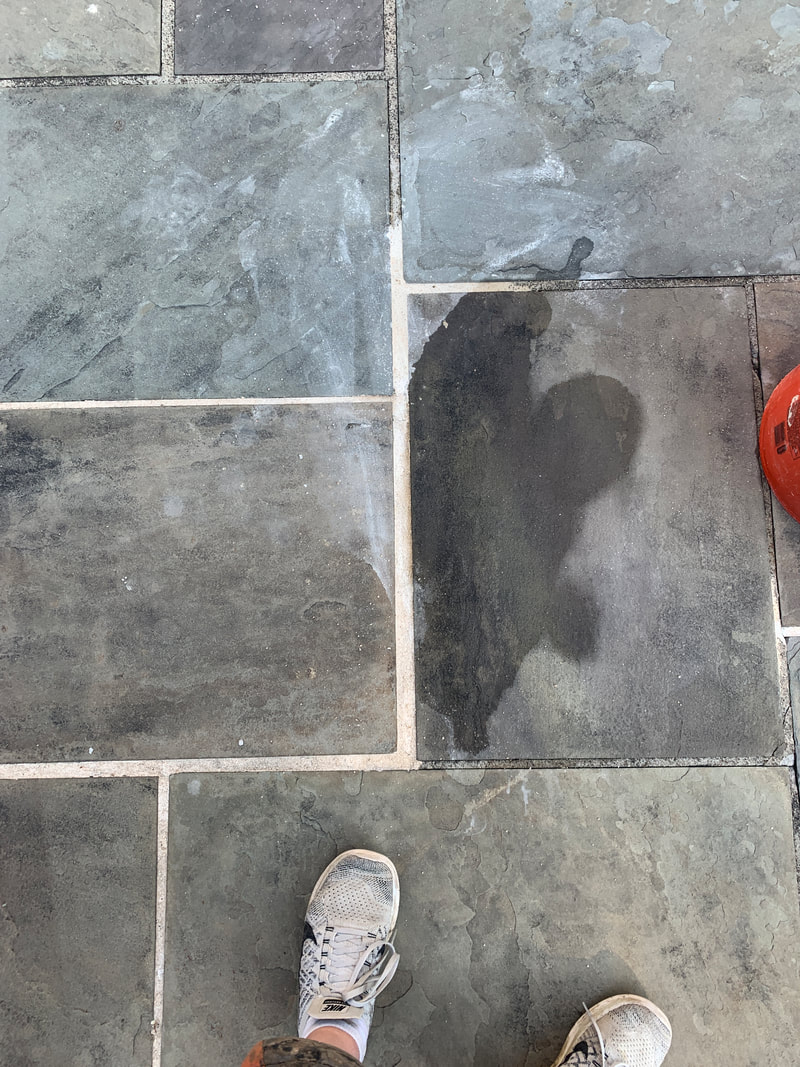
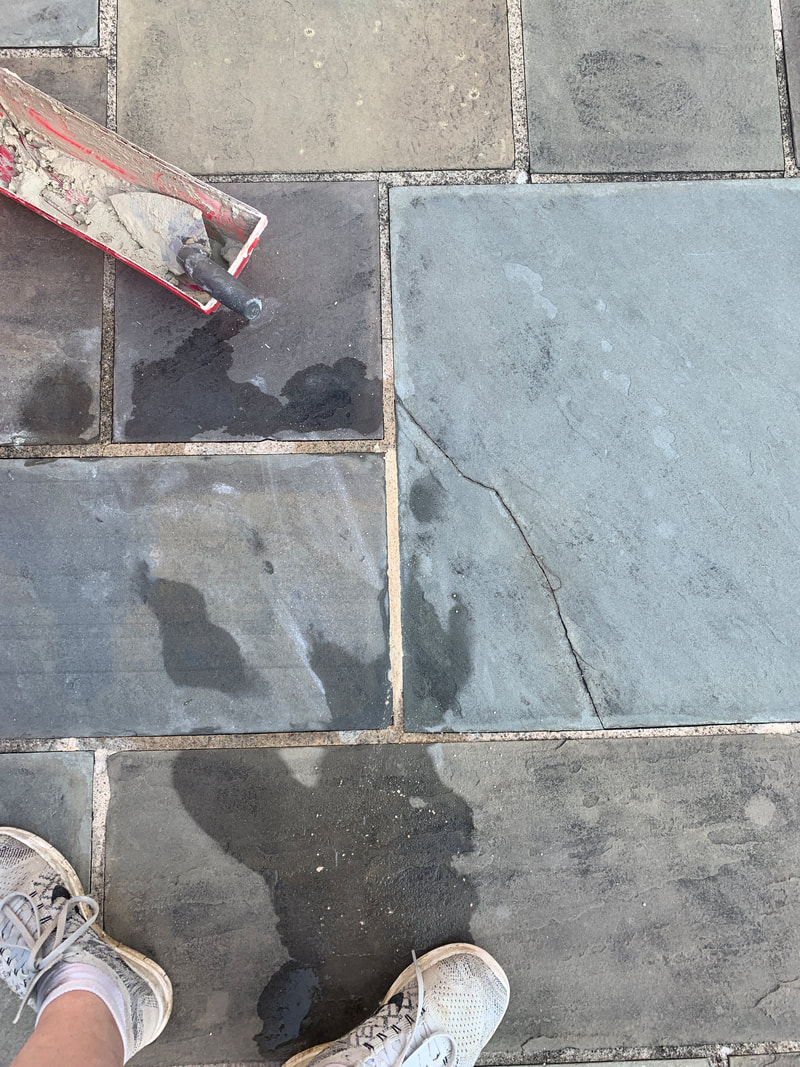
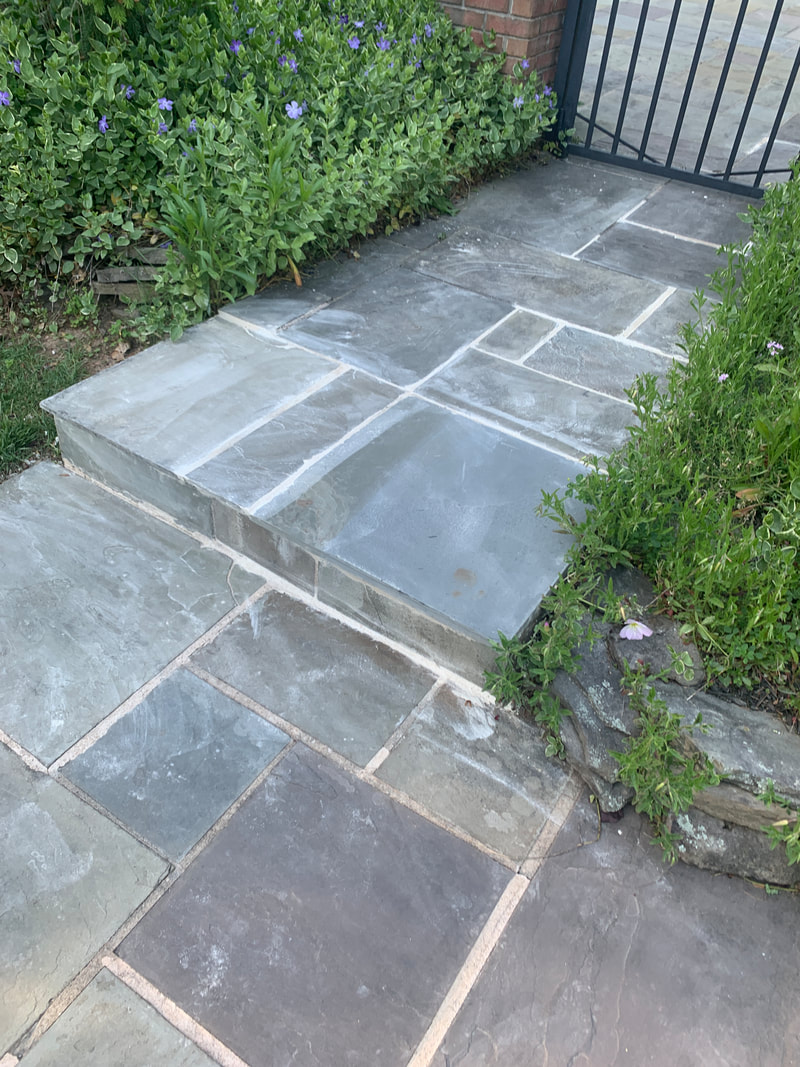
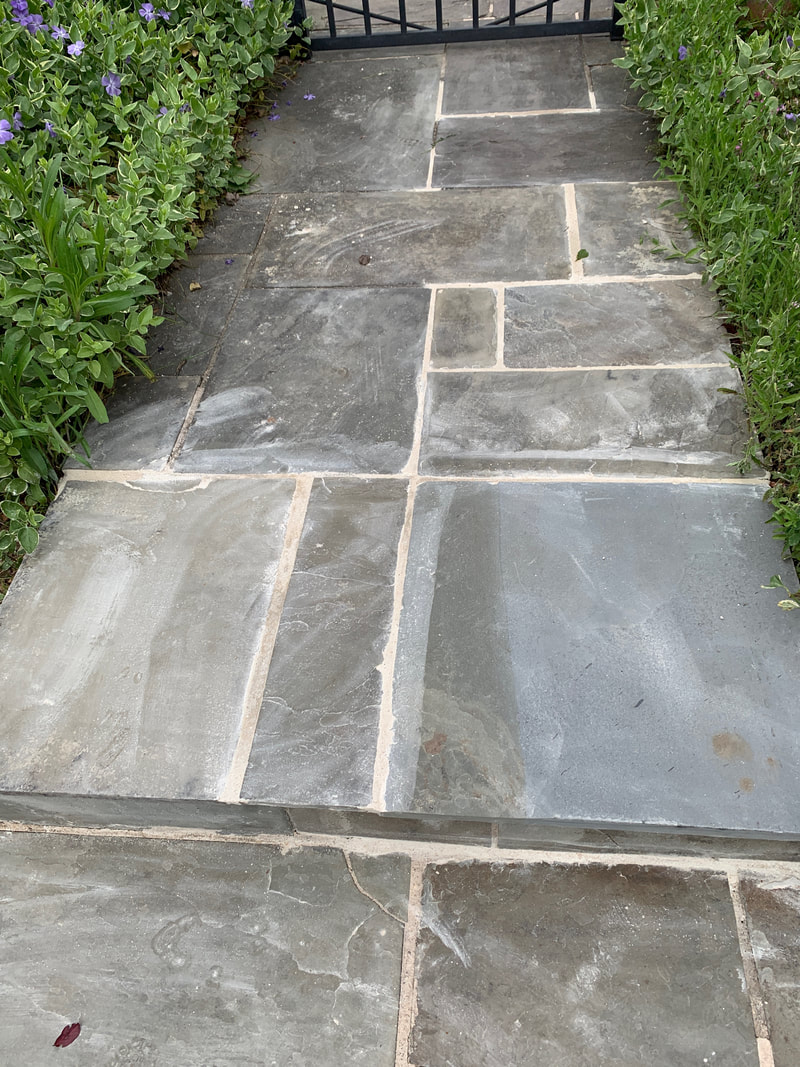
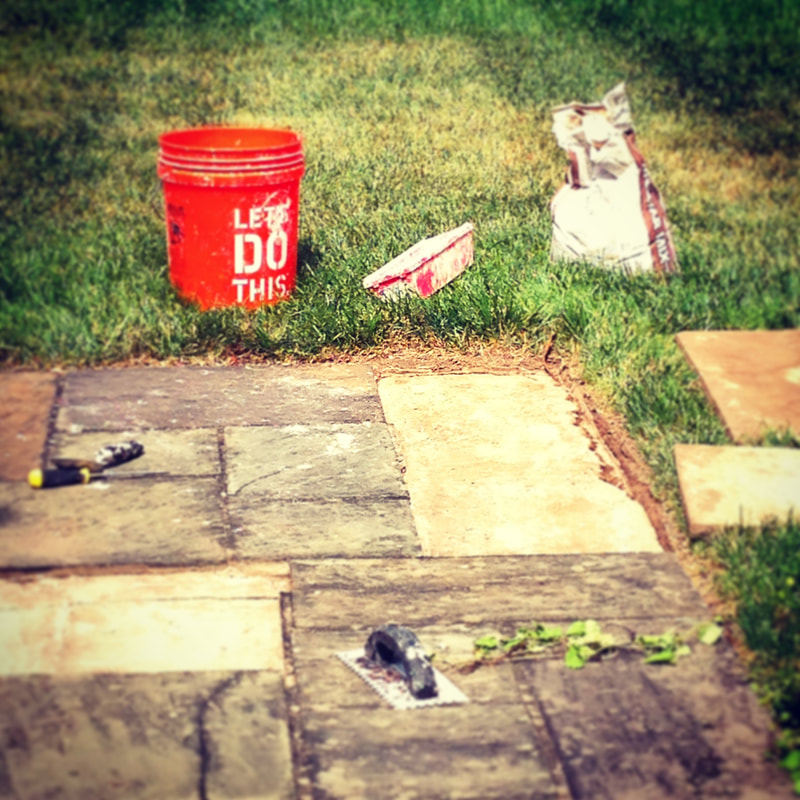
Weekend update. It’s the springtime in the Northeast which only means one thing for my mom and me. Time to get a jump start on our annual traditions at my parents’ house. You’re probably assuming I am talking about prepping the flower beds and planting the herbs…well not exactly! It’s time to get out our goggles, the knee pads and get our hands messy with a grinder, some chisels, mortar and bluestone tiles. That’s right – it’s masonry season. Each year, we are a well-oiled machine. First, we do the instantly gratifying work of power-washing the stones. Then we jump into our inspector outfits and check for any grout lines that have popped up or tiles that are loose. And finally, we then spend the following weekend(s) patching in. However, this year was a different task. So, for twenty years, everyone places their right foot on this one step of bluestone that leads you into the pool area of my parents’ backyard. And finally, the stone said – I’m done. It started to delaminate and eventually crumbled into numerous pieces. All the other major steps in the backyard have about a 2.5” thick piece of stone but this one step is just your typical stone tile. It was bound to crack at some point. And this is where our minds came together and said we need to tackle this stone a bit differently. We need to swap out that one tile for a tile that would be slightly thicker. After some digging in the garage, we luckily found a tile that was the exact same size as the previous tile and hit our new requirement for its thickness. From here is where the project takes shape. But we each knew what we needed to do. Step 1 Start with lifting the tiles and place them on the grass in the exact pattern they appear in the patio area. This ends up being a bit of a domino effect. You think you are only going to fix two tiles and halfway into the next few steps, you are on piece seven. So, knowing where the puzzle pieces go is useful. Step 2 Put those Breaking Bad style goggles on – you’re going to need them. Grab an old straight edge screwdriver or chisel and chip away at any grout lines that are loose with a swing of your hammer. This is the easy part, but tedious. Step 3 Now the hard part. The area under the original tile is going to need to be roughed up a bit too. By this, I mean you need to chip areas under the stone where you can place a significant amount of new mortar for the stone to adhere to the cement. Like I said before, this step project was a bit different. We grabbed our new grinder and made long “X”s into the cement base which allowed for use to chip larger chunks away for our new thicker stone tile. After each run through with the grinder and chisel, we would place the new tiles in location to gage where we needed more chisel attention. And we would continue this process for all the tiles that needed to be replaced. This took hours. But knowing that if we didn’t do this correctly, we would never have an even step with the seven tiles around it and the pitch could be off. Step 4 Vacuum up all the chips (and dirt). You’re going to want a super clean area for the new mortar to adhere to. Our shopvac is clearly the best tool for this! Step 5 It’s time to get mixing. First things first – clean water throughout this process is ideal. Mixing mortar is like making buttercream – it can be too runny and slide right off the cake or it can be too viscous and harden in three seconds. You got to find that balance. So, grab that 50lb bag of mortar, a trough (pan) and trowel. I tend to start with the mortar mix in the pan. A few handfuls and then slowly add some sponge squeezed water into the pan – just a little. You can always add more water. But sometimes, you just don’t have enough mix. Like I said, find that Goldilocks balance that feels like you are about the frost a delicious red velvet cake. Step 6 Moving and lifting time. Start with the placement of tile that is adjacent to the most tiles. For us, we started at the top right because we had an edge to follow and two sides that we can gage the positioning and sense of levelness. Use a sponge to wet the backside of the stone tile – better grip for the stone. Pour out all the contents of the pan onto the cement base and spread it out evenly. You’re going to want this stone to grip completely, so it’s okay to have a bit extra that will ooze into the grout lines. If you need to mix more mortar, get moving. Place the tile down and wiggle it around until you find it’s perfect location. Now, stop and reset for your next tile. Jump back to the mortar mixing phase and continue placing all the tiles in their puzzle locations. We had seven tiles that needed to be placed. As I mixed and lifted tiles in place, mom was washing down spills and adjusting placements. Step 7 Once all the stone tiles are in place, we can switch gears to filling in those grout lines. When I mix mortar for the grout, I tend to mix a bit of a watery mix compared to my buttercream frosting mix for stone placement. Is that right? Not sure, but that’s how I do it. I scoop out a little at a time, pour it into the grout line and bounce the trowel in the grout to pop any air bubbles. After letting that sit for a few minutes, it’s time for mom’s washing skills to take center stage. She uses a clean damp sponge and, on an angle, wipes the excess grout off the edges of the stone. After going one way, it’s time to go back in the opposite direction until the grout lines are smooth and the top of the stones are clean. Each time she cleans off that sponge. And as all good spring traditions end, we watch the finished product set over acai bowls and put our feet up on the outdoor coffee table. Until next time, keep swinging that hammer!
0 Comments
So, I get on the phone with my 95-year-old grandfather. I try to explain to him what a blog is by comparing it to writing a column for a newspaper or magazine. Specifically, I’d be writing pieces about how I got into home remodeling, how I would tackle a project and what sort of projects I find interesting.
“Listen you have the knowledge, you have some time, and it doesn’t cost you any money – so why not?” Now read that again with a heavy European accent and now you have become my poppy! And again, that dawned on me. ----- I’m always browsing through real estate sites and judging people on how they place their furniture or even what color they pick for their walls. I know, petty – but get over it! These are things that totally change the perception of a property and even give a visitor a preconceived opinion on how the homeowner lives their life. So, let me give you a bit of a tutorial from my under $200 upgrade that completely changed the style of a fireplace – and ultimately, the perception of my home. Like in many family rooms, the fireplace is the focal point. The place where everyone envisions reading a good book wrapped under a furry blanket with the smell of wood burning. For me, not so much. Scratch the book and put on some hockey. Still this fireplace with the TV wires hanging all over the place, the weird sheen on the slate tiles and wood surround that matched the Amazon cardboard box colored walls did not pull you into the space. See my before picture – you’ll get the gist! So, let’s dive into the steps of this transformation project. Step 1 Use that hammer to remove that outdated wood surround. Yes, like in most cases, a clean slate is the best place to start. In my case, the bones of the house had its potential. Luckily, I could keep the strangely polyurethane covered slate tile surround, but you could have easily removed that and found new tiles to replace them with. Of course, that adds some time and pesos to the project costs. Plus, you need to make sure you keep at least a 6” clearance around the fireplace opening to meet proper code. But if you can salvage what you have with some elbow grease (okay, lots of elbow grease in this case), save the cash for your next project. Step 2 Map out the plan. Let the Sharpie do the talking. While I wanted to bring the visual attention to the fireplace, I wanted to balance the wall and not leave your eyes at the lower half of the wall. So, for this case, I wanted a background to be consistent from floor to ceiling and ideally something that would cover all those annoying TV wires. I knew that shiplap was going to be an inexpensive way to achieve the visual goal. But shiplap comes in many different types of wood, colors and sizes. Do you pick the dusty gray, the charred brown, or the prime white or the many other options? Do you go with MDF or pine? And what size shiplap should you work with? Many of these options were easily eliminated because of my measurements! Because I was looking for the clean, white wall to contrast the black slate and reclaimed wood mantle ledge I would add, I went with a 5.25” nickel gap primed pine shiplap. The nickel gap literally means that a nickel could fit between the two boards when they stack. So that gap between the boards wouldn’t be too noticeable. Step 3 Look to bury those annoying TV wires. If you can keep the sheetrock intact while doing your demo – Bravo! I used a level, marker and then a sheetrock knife to notch a GPS directed trench-line for my TWO wires. One to use today and one as an extra for the future. Never know if one is going to die. Future note: take a photo of where you place the wires with some measurements from visible guides. You don’t want to puncture them in any of the next steps. Step 4 Measure, measure again and then cut your pieces out. That may sound redundant, but who likes spending extra time going back to a store for one item because you cut your pieces incorrectly. Step 5 Take your time placing the first plank. I tend to start in the middle because most homes have at least one wall that’s not straight and this lined up perfectly with my slate tile edge. Place a bead of construction adhesive on the back of the plank and use the nail gun to place one tack in the middle. And here is where I needed a shim – a sliver of wood that can be wedged to help in leveling. The slate tile didn’t have a level edge. But a little finessing did the trick. Continue away with working your way up or down the wall making sure the planks stay level. The planks fit together perfectly like a children’s puzzle. If you find that your wall is not plum (vertically level), use that shim again! Step 5 Voilà! Now that we’ve made it up and down the wall it’s time to finish those edges. I found some simple outside edge molding that was the perfect depth of the shiplap. With another little bead of adhesive and a few tacks of the nail gun – boom almost there. Now just fill in any holes that you have from the nail gun with some painter’s chalk, let dry, sand and paint! Step 6 Add a mantle ledge. I ended up browsing my go-to favorite, Pottery Barn, and came across a reclaimed ledge that was exactly what I was planning on making. I could have purchased a 4”x4” or 4”x6”, beaten it with an old chain, sanded it, stained it, and added some clean “L” brackets, but typing in my credit card information, was way easier. This is where that old photo of the trenched TV wires comes in handy. When hanging this ledge, I knew I needed to be at least 12” from the fireplace opening and that my TV would be hanging above. So, basically a delicate balance between the two would be best. Step 7 Hang the TV, plug everything in, add a bit of décor and I was done with this little project. Maybe this was a small project to get everything started with. But the difference it made in the room was instantaneous for a little more than “it doesn’t cost you any money” and some time. So now, it’s time to light a fire, get buried under a comfy blanket and turn on some hockey – oh wait, the NHL season is suspended. Until next time, keep swinging that hammer! This idea of starting a blog always brings me great stress. Where does one start? What would I even write about? Why me? Do people really want to read what I am writing? I don't even think I'm that interesting.
However, my best friend kept nagging me over the past years to find ways to document my struggles of being a girl who knows more than most guys about the world of home remodeling. "I'm telling you - people want to hear about this stuff. You just understand where to start and have great designs." We all have these great visions of the world through the lens of the Gaines Family. And in all honesty, it looks so heavenly with their modern rustic farmhouse with the tin roof and their perfectly matching chambray button-down shirt and boots. But being 1,619.5 miles away from Waco, the world of construction and design may be a bit more realistic. So I guess the right way to start this off would be to tell you how I came up with the name of this blog - Designed with a Hammer. It all started this morning when I was waiting for my second cup of coffee, okay my third, to brew. As the coffee maker was heating up, I was staring off at the design of my 80s kitchen and thinking of ways to tackle this project over the next few months. In the case of beige Formica kitchen, I need to find out if I can remove the soffit that is above my cabinets before anything else. For those that don't know what a soffit is, it's technically a structure that can be used to architecturally and/or aesthetically cover any structural beams or needed vents in a particular design. But in the late 80s/early 90s people thought this design feature vogue! I don't know who those people are, but listen lady - this person needs the storage space for my mason jar mugs and tortilla chips. And the name just came to me. The first thing that needs to be done is to look behind the soffit. Truly gage the scope of the project. Can I just get rid of it? All "signs" suggest I can. The range vent is technically a ventless hood. So, no duct work to worry about. The water lines that run to the upstairs bathroom would go straight up and not interfere with the soffit from a dimensional perspective. So great, no need to get a plumber involved. And the soffit abruptly ends on both sides suggesting that it's not structural. Fantastic, so no need for new headers or need to get an engineer involved. But have I thrown that hammer to the wall to truly see for myself? And that was it. All my projects in the past have had a plan on paper, even if it was just a rough sketch on the back of my lululemon receipt. But they had a plan. And from that plan, I would grab my tool belt that adds close to 25lbs. to me (bonus - no need for the gym that day) and find my grandfather's hammer to use to peek behind the sheetrock. Each design starts with the swing of that hammer. And each design ends with a swing of the hammer to hang up the final piece of artwork. So it was only fitting that I use the name Designed with a Hammer. Over my upcoming posts, I will give you a glimpse of where I got my construction knowledge (it’s probably not from my bachelor’s degree in neuroscience or MBA in strategic management), sagas from some my past few projects and thoughts on new ventures I want to tackle. I think that is where I will leave you for the time being. After all, we don't need my stress level to increase. |
 RSS Feed
Photo used under Creative Commons from Jurgen Leckie
